Step 2: Network Configuration
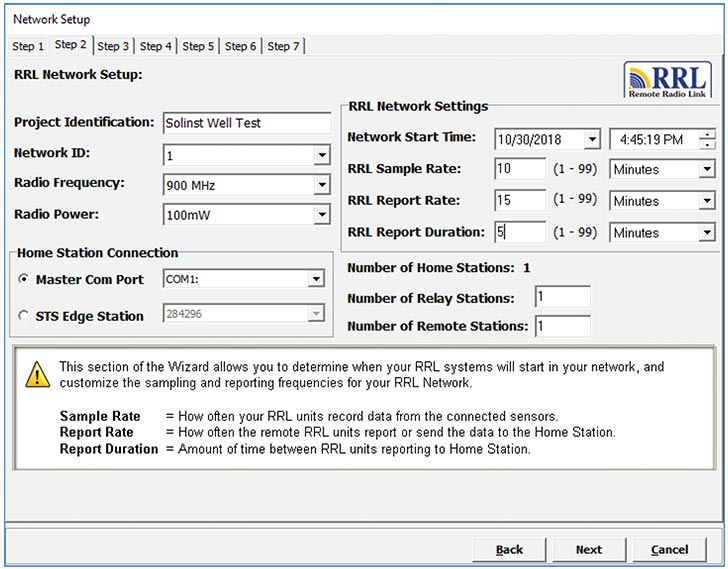
After you select "RRL Site", the RRL Network Setup screen will open. In this screen you will enter the settings for your RRL Network.
Project Identification: Input the unique name you choose to identify your project/site.
Network ID: Select a number to identify the network. There may be more than one network reporting to the same Home Station computer. There can be a maximum of 5 networks reporting to the same Home Station. This is to avoid radio communication conflict between adjacent networks. Each RRL Station in the same network should use the same ID number.
Radio Frequency: Select the frequency of your RRL radio modules. RRL Stations use a 900 MHz radio module.

Figure 4-4 RRL Network Setup Screen
Radio Power: Selecting a lower power setting can reduce power consumption, however, the communication distance is directly proportional to the radio power. Choose 100 mW to maximize battery life. Choose 1W to maximize the communication distance.
- Home Station Connection:
- When connecting your RRL Home Station to a PC, identify the Master Com Port being used for communication between the computer and the RRL Home Station.
- If you are connecting your RRL Home Station to an STS Edge Station, identify the serial number of the STS Edge you are connecting to. See the STS Edge User Guide for more information on bridging your RRL Network with an STS Edge Telemetry System.
Number of Home Stations: This is always 1.
Number of Relay Stations: Enter the number of Relay Stations in your network.
- Number of Remote Stations: Enter the number of Remote Stations in your network.
- Network Start Time: Enter the date and time your RRL Remote Stations will begin collecting data from the attached dataloggers.
- Sample Rate: Is the frequency the RRL Remote Stations collect real-time readings from each of the attached dataloggers. The Sample Rate can be set from 10 seconds to 99 hours. You can choose to set each station with a different Sample Rate. This can be done in Step 4 when you are setting up each individual station, otherwise all stations will have the same sampling rate as set in this step.
Note:
If a higher Radio Power setting is selected, the battery at the RRL Station will be drained more quickly, therefore you may require an external power source.
Note:
If the highest Radio Power setting is still not adequate to communicate the distance required, you may need a more sensitive antenna or the addition of a Relay Station.
Report Rate and Report Duration are important if multiple RRL Stations will be reporting to one Home Station. Setting up a schedule will avoid conflicts that may occur if more than one RRL Station contacts the Home Station at the same time.
Report Rate is the rate at which stored data is sent from a Remote Station to the Home Station. The Report Rate can be set from 1 minute to 99 hours.
Report Duration is the maximum span of time that a Remote Station will be in contact with the Home Station during the transfer of data. The minimum Report Duration is 1 minute.
Note:
Longer Report Rate intervals will conserve battery power at Remote Stations
Note:
If your Reporting Rate is less than 3 hours, an external power source is recommended.
Example:
If you have three Remote Stations reporting to one Home Station, all with a Report Rate of 15 minutes, you will want to set a Report Duration of 5 minutes (or less) for each RRL Station. This ensures that each Remote Station has enough time to send the data within the 15 minutes allotted on the Home Station.
If you have set a Network Start Time of 12:00 PM, your RRL Remote Stations will begin collecting data at 12:00 PM. At 12:15, the first Remote Station will report its data; the second will report data at 12:20 PM, and the third at 12:25.


