For initial setup and direct communication with Solinst Cloud, the LevelSender 5 must have three lithium batteries installed and be connected to the computer using a USB cable (available from Solinst). The connection is accessed by loosening the nut around the antenna and removing it along with the top cap (remove the three screws).
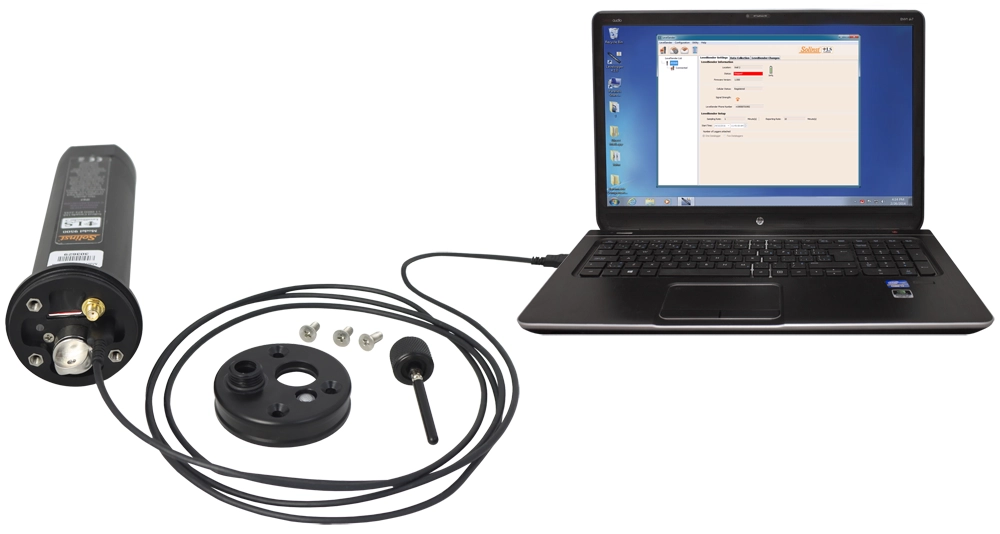
Figure 5-1 Connecting a LevelSender to a computer via USB cable
When connected to Solinst Cloud, a LevelSender can be programmed and added to a project, settings can be reviewed and edited including updating SIM Card Settings (see Section 5.1.1), and Diagnostic Information obtained (see Section 7.1).
Get to these options by clicking the Connected LevelSender options from the main menu.
5.1.1 Adding a LevelSender
You will be prompted to Project View when setting up a new project, where you can Add a New Device. See Section 4.1.
You can also add a device by going directly to Project View, under Devices (see Section 4.2.3) or Connected LevelSender from the main menu.
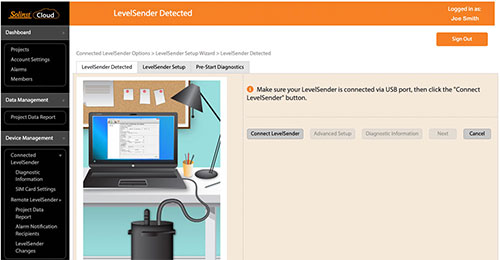
Figure 5-2 Connecting a LevelSender to Solinst Cloud
With your LevelSender connected to the USB port, click Connect LevelSender. This starts the LevelSender Setup Wizard.
Note:
You can re-program a previously configured LevelSender by using the following steps, or if you just need to update the SIM Card Settings, go directly to that option in the main menu once the LevelSender is connected.
Once the connected LevelSender is detected by the Wizard (this may take a few seconds), click Next to continue the setup.
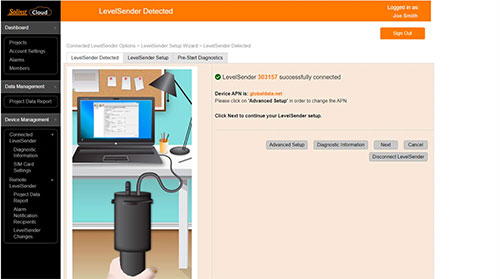
Figure 5-3 LevelSender Detected
Or if you have set up a data plan with a cellular service provider other than Solinst, for example, select Advanced Setup in order to change your APN/SIM Card Settings. You can test that the settings are correct by clicking Diagnostic Information and performing the tests. See Section 7.1 for more on diagnostics. Click Next when finished. Click Cancel to exit the Wizard at any time.
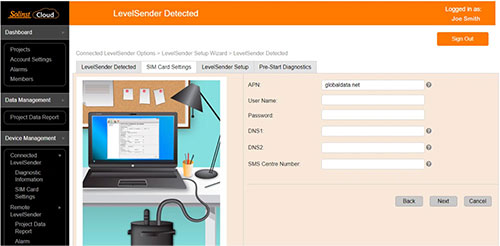
Figure 5-4 LevelSender APN/SIM Card Settings
5.1.2 LevelSender Setup
In this step you will enter your LevelSender Settings. Ensure the correct project is selected in the drop-down menu. Optionally, enter a name for the LevelSender (the serial number is the default).
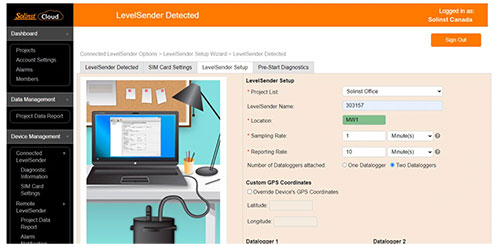
Figure 5-5 LevelSender Setup
Complete the following information for the LevelSender set up:
- Location: enter specific site / location information to identify each LevelSender.
- Sampling Rate: the rate that the LevelSender collects data from the connected datalogger(s). Sampling Rate can be set from 1 minute to 99 hours.
- Reporting Rate: the rate that the LevelSender reports collected data. Reporting rate can be set from 5 minutes to 99 hours. With each report, the LevelSender will also check for remote updates from the Solinst Cloud.
Note:
The LevelSender will use battery power each time it samples, reports, and checks for updates. As such, more frequent intervals will drain the battery more quickly. See the LevelSender User Guide for more details.
- Number of Dataloggers Attached: select one or two dataloggers.
- Checking the Enable Barometer with Unit box provides both barometrically compensated water level data and a raw water level data. Units of measurement for the internal barometer pressure readings are available in psi, kPa, and mbar.
- Custom GPS Coordinates: each LevelSender obtains GPS coordinates from the cellular network based on the location of the nearest cellular tower. However, you can override the network information and enter your own coordinates to map the LevelSender location.

Figure 5-6 LevelSender Datalogger Settings
- Select Logger Type: select the type of datalogger connected, e.g. Levelogger 5, Barologger 5, etc., then select the units of measurement for each data channel.
You can optionally select and program the connected dataloggers to record simultaneously in their own internal memory as a back-up. Check the box to select independent logging and enter the following details:
Note:
When using a Splitter, the number 1 or 2 will identify the Dataloggers in Solinst Cloud. The numbers are labeled directly on the Splitter.
- Location: specific site / location information that you input to identify each datalogger.
- Sample Rate: the rate at which the datalogger records in its internal memory. Sampling rate depends on the type of datalogger connected.
- Start Time: set a date and time for the datalogger to start independent logging.
Note:
Programming independent logging in the dataloggers can also be done after setting up the LevelSender station, by sending a remote change via LevelSender Changes (Section 5.2.3).
Note:
If the connected dataloggers are already logging, they will be stopped with the startup of the LevelSender, and restarted if you selected the option described above. It is recommended to download the data in the datalogger before connecting to the LevelSender. If you do not enter any settings for the loggers or select the "Start Datalogger" box, the datalogger will automatically be stopped with LevelSender startup and independent logging will not start.
5.1.3 Alarm Setup
The alarm setup allows you to set specific alarm conditions for each of the dataloggers attached to the LevelSender. If an alarm condition has been met, notifications will be shown in various locations in the Solinst Cloud – the Dashboard, Project View, and Alarms.
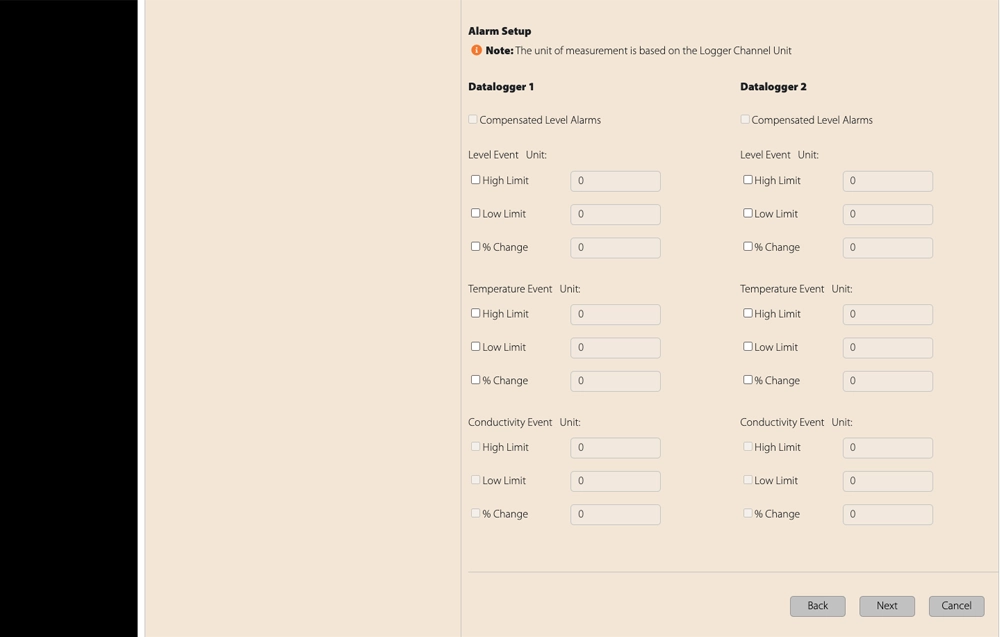
Figure 5-7 Alarm Setup
Note:
An automatic alarm will be triggered if the LevelSender battery falls below 60% (2.7 Volts).
Select if you would like your alarms to be based on compensated water levels.
For each channel parameter (level, temperature, conductivity) you can set a "High Limit", "Low Limit", and "% Change" alarm event. The "High Limit" sets a value, that if exceeded by a datalogger reading, will result in an alarm condition being met. The "Low Limit" alarm condition is met when a reading taken by the datalogger goes below the set value. A "% Change" alarm condition is met when a reading taken by the datalogger changes by the set percentage, from the last recorded reading.
Note:
Rainloggers only allow a "High Limit" alarm to be set.
Note:
The frequency that alarm conditions can be reported is based on the Sampling Rate set for the LevelSender.
Note:
Setting up alarms can also be done after setting up the LevelSender, and going to the LevelSender Changes (Section 5.2.3).
Click Next to continue the setup.
5.1.4 Pre-Start Diagnostics
The Pre-Start Diagnostic tests are done automatically when you reach this step.
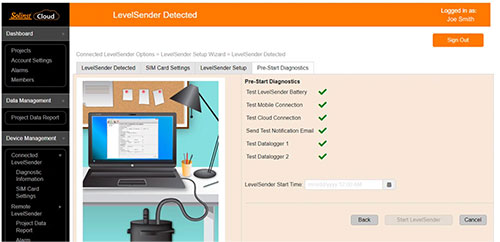
Figure 5-8 Pre-Start Diagnostics
Test LevelSender Battery: this test will fail if the LevelSender battery is below 2.5 volts.
Test Mobile Connection: checks if the LevelSender is connected to the mobile carrier. The possible causes of failure are: improperly inserted SIM Card, low signal strength or power failure.
Test Cloud Connection: checks if the LevelSender is connected to the Solinst Cloud.
Send Test Notification Email: sends a test email to project members.
Test Datalogger: tests the communication of the attached datalogger(s).
When all the tests are passed, select a LevelSender Start Time, then click Start LevelSender to complete the setup of your LevelSender. The LevelSender will start collecting data at programmed start time.
Note:
The LevelSender will start working immediately if you set a start time earlier than the current time.
You can also start your LevelSender using the Remote LevelSender Changes options or the Solinst Cloud LevelSender Field Utility once in the field (see Section 8.0).
Note:
A LevelSender can be stopped from sampling/reporting by running diagnostics (Section 7.1), or remotely using LevelSender Changes, see Section 5.2.3 (will still check for remote updates at the reporting interval), or the Solinst Cloud LevelSender Field Utility (see section 8.0).


