Note:
For information on downloading and starting the Levelogger PC Software, see the Vented Dataloggers User Guide.
3.1 Setting the MODBUS Device Address
In the absence of a functional AquaVent logger, or without setting a specific address or Baud rate, the Wellhead will power up with a default MODBUS device address of 1, and a default Baud rate of 19,200.
Note:
The RS-232 or RS-485 Connector Cable can remain in place while programming the AquaVent.
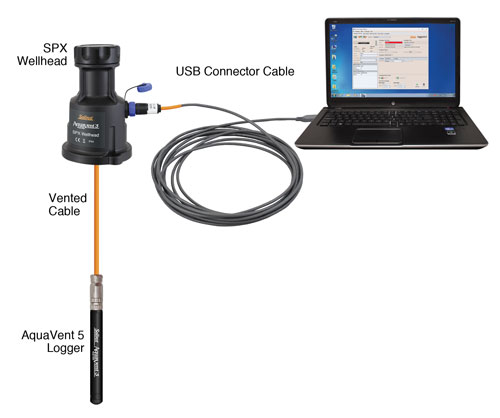
To set the device address for the AquaVent logger, it must be connected to Solinst Levelogger PC Software. The AquaVent communicates with the Software using a USB Connector Cable connected to the SPX Wellhead. The USB Connector Cable connects to the 10-pin (Solinst Protocol) connection on the Wellhead.

Figure 3-1 Communicating with Levelogger Software
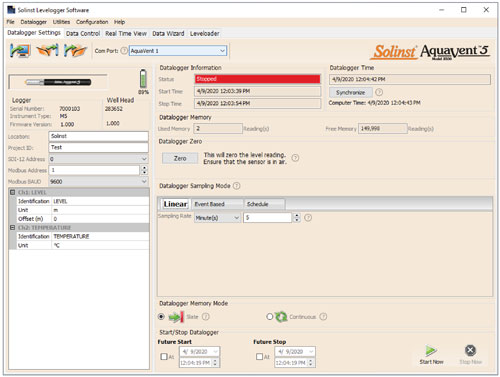
After you start the Levelogger Software, the Main Window will appear, with the Datalogger Settings tab open.

Figure 3-2 Dataloggers Settings Tab
Select the appropriate device from the centre Com Port drop-down menu.
Click ![]() to retrieve the current settings from the connected AquaVent logger.
to retrieve the current settings from the connected AquaVent logger.
After you have retrieved the settings of the connected AquaVent, the Datalogger Settings tab will identify the Instrument Type, Serial Numbers, Firmware Versions, Project ID, Location, the Channel Settings and Battery Level.
Here, you can set the MODBUS device address and the Baud rate. Valid addresses range between 1 and 247.
Note:
Once you are finished programming your AquaVent logger, unplug the USB Connector Cable from the Wellhead. The Wellhead only communicates with the MODBUS network when just the RS-232 or RS-485 Connector Cable is connected.
You can also change the units that the AquaVent will be measuring in for the Level and Temperature Channels.
Once you have set the address, Baud rate, and any other desired settings, click the start button ![]() . This applies the address and settings to the logger, AND starts the AquaVent logging internally.
. This applies the address and settings to the logger, AND starts the AquaVent logging internally.
If you do not want your AquaVent to log internally, independent of MODBUS
operation, click the stop button ![]() .
.
(See Section 2 for more information on the independent recording option).


