Solinst Model 107 TLC Meter Calibration Instructions
Read Full TLC Meter User Calibration Transcript
Conductivity Sensor
User calibration allows for adjustment of a TLC Meter accurately when the probe has been degraded slightly due to mechanical, biological or chemical affects. If readings of calibration solutions are outside the 5% accuracy range, the user can conduct a recalibration at 1, 2, 3, or 4 separate conductivity levels, using standard solutions (1413, 5000, 12,880, or 80,000 μS/cm). User calibrations are required regularly; the frequency will depend on usage and monitoring environment. As a precaution, calibration can be done before every usage.
Notes:
- For highest accuracy, it is recommended to use a 2-point calibration with solutions closest to your expected conductivity range in the field - starting with one solution below that range, and one above.
- The de-ionized water, calibration solutions and the probe should all be at room temperature when conducting the calibration.
- Calibrate only with 1413, 5000, 12,880 and 80,000 μS/cm solutions. Calibrating with other solutions will cause errors.
- Clean probe thoroughly before each calibration step by rinsing in de-ionized water until the conductivity reading reaches ~ 20 μS or less.
- Do not let the probe rest on the bottom of the cylinder.
- Always ensure that no bubbles are trapped inside the probe shroud. Air bubbles will result in inaccurate calibrations.
- Select fresh calibration solution of the range(s) closest to what you expect to measure in the field.
- Starting with the lowest conductivity calibration solution, clean and rinse the probe with DI water, then rinse with the calibration solution.
- Insert the probe into the calibration solution, stir to remove any bubbles from the sensor, and wait until the sensor has reached equilibrium.
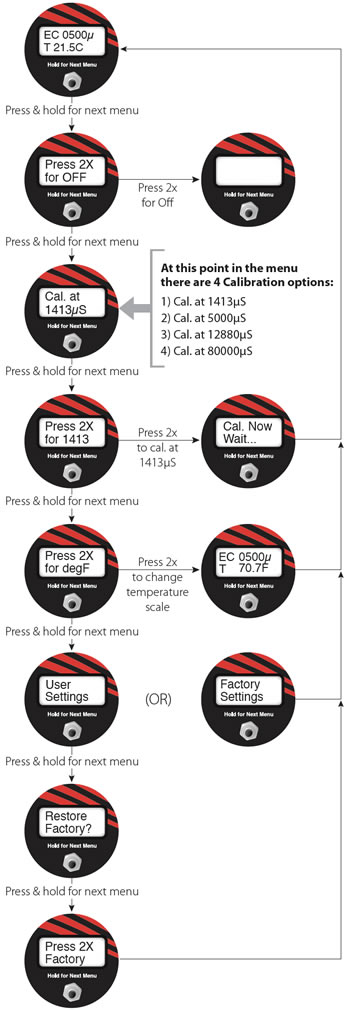
- Press and hold the button repeatedly to scroll through the menu until you see the appropriate calibration point i.e: "Cal. at 1413μS".
- Press and hold the button once more until it says, for example, "Press 2x for 1413". Press the button 2 times quickly to calibrate the probe at the specified point.
- After "Cal Now Wait..." appears, the value of the conductivity calibration point will be shown on the main EC/T display.
- Repeat Steps 2-5 for each calibration solution you are using.
- Turn off the TLC Meter. The TLC Meter is now ready for field use.

The LCD Display Menu
Restore Default Factory Settings
(Firmware 2.01 and up)
See the Troubleshooting section below for a description of circumstances where a default factory settings restore may be required.
Notes:
To determine if you are using default factory settings or user calibrated settings, press and hold the ON button repeatedly to scroll through the menu until you see "Factory Settings" or "User Settings". If in "User Settings", the next menu will allow you to restore the factory default settings.
Follow these steps to restore the TLC probe back to factory default settings:
- Turn the TLC Meter ON. Press and hold the button repeatedly to scroll through the menu until you see "Restore Factory?".
- Press and hold the button until "Press 2X Factory" appears.
- Press two times quickly to restore the unit to the default factory settings. The screen will return to the main EC/T display.
Notes:
To change the temperature scale between ºC and ºF, press and hold the button repeatedly until "Press 2X for degF" displays. Press the button 2 times quickly to change the scale.


