Tools & Materials Needed
- Model 102 Water Level Meter or 102M Mini Water Level Meter Replacement Cable
- Available with P4 or P10 Probe attached
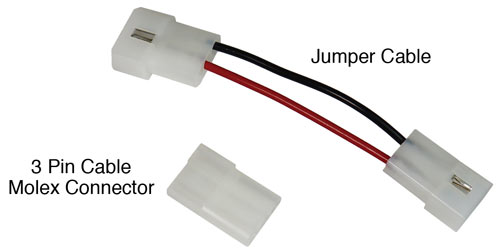
- Jumper Cable (New Cable - 3 Pin to 2 Pin) (#110508)
- 3 Pin Cable Molex Connector
- Grommet
- Phillips or Robertson Screwdriver
- Wire Cutters
Note:
The Jumper Cable is required if you are connecting the new cable to a Mk1 Model 102 Water Level Meter that has a Molex connector from the faceplate electronics with a 2 pin connection.
Instructions
- Remove the battery. Unwind the old cable, and cut the cable at the end near the grommet.
- Place the reel on a flat workbench with the faceplate up. Undo the three screws from the faceplate, and slowly remove it from the reel.
- For Mk1 Model 102 Water Level Meters, disconnect old Cable Molex Connector from the Faceplate Molex Connector.
- For the Mk2 Model 102 Water Level Meters, press down on the white terminals of the push-release fittings on the circuit board to remove the cable leads.
- Undo the two screws from the black plastic bridge holding the cable inside the reel hub, and remove the top piece of the bridge.
- Pull the cable through the grommet and remove from the reel.
- Feed the new cable with connector pins through the grommet into the reel hub. Without tangling the cable, feed about 1 ft (0.3 m) of cable through the grommet so as to provide enough slack to continue.
- Tie a knot in the cable, approximately 5" (125 mm) from the end, to secure it from going back through the black plastic bridge (or the grommet in a 102M Mini reel).
- For the Mk1 Water Level Meters, by hand, insert the connector pins into the new Cable Molex Connector. The negative connector pin is inserted into the terminal on the pointed side of the Cable Molex Connector, and the positive pin into the middle terminal (the negative pin is on the lead with the black insulated braided wire).
- For the Mk2 Model 102 Water Level Meters, cut the pins on the replacement cable leads at the point shown in the illustration below. Use pliers to flatten the pins against the cable leads, so they fit in the terminals on the circuit board (see Step 13).
- Position the cable inside the reel hub with black plastic bridge over top (the notch allowing the cable to run through the black plastic bridge facing downward) and refasten the two screws to secure the cable to the reel.
- For the Mk1 Model 102 Water Level Meters, use the Jumper Cable to connect from the new 3 Pin Cable Molex Connector to the 2 Pin Faceplate Molex Connector.
- For the Mk2 Water Level Meters, press down on the white terminals on the circuit board and insert the cable leads. Release the terminals and the cable leads should be secured. The negative lead is inserted into the terminal with white square below it on the circuit board. The positive lead has the pin connected to centre wire, the negative pin is connected to the black insulated braided wire, see illustration on left.
- Replace the battery.
- With probe in a glass of tap water, turn the Water Level Meter to the 'ON' position. If the connections are correct the buzzer and light on the Meter will be activated. Check connections if the buzzer does not sound.
- Replace the faceplate on the reel and re-secure the three screws.
- Wind the cable onto the reel, slowly, holding to ensure no slack.
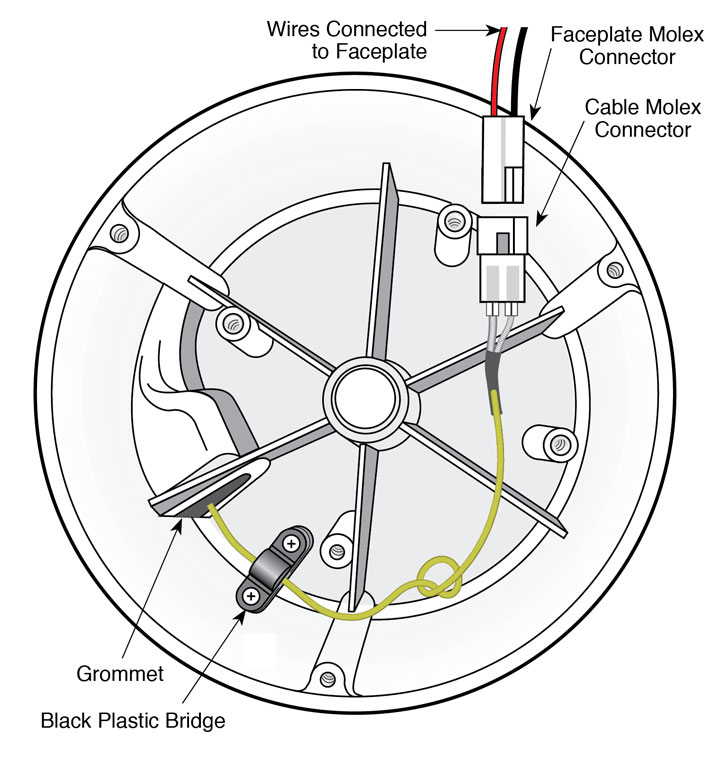
Inside View of Mk1 Model 102 Reel Hub Showing Connection Detail
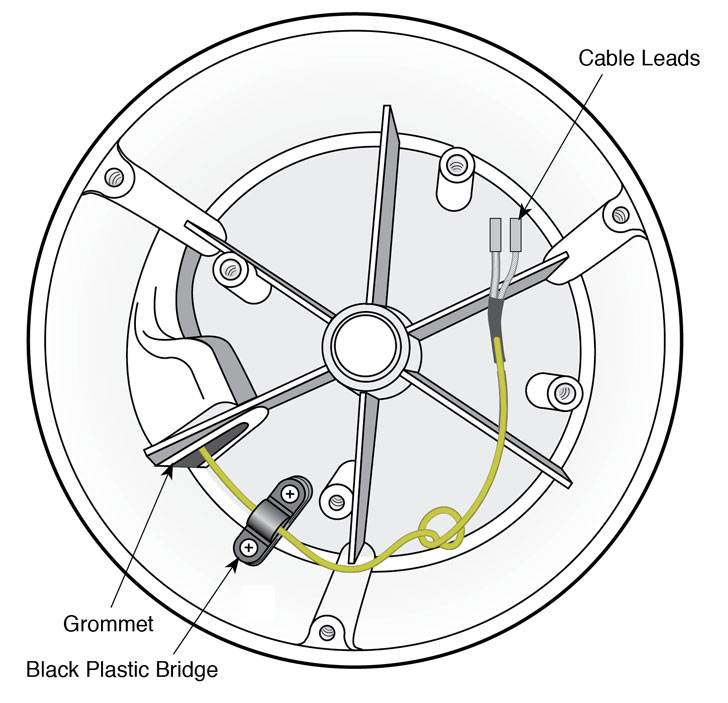
Inside View of Mk2 Model 102 Reel Hub Showing Connection Detail
Note:
There is no black plastic bridge in a 102M Mini reel.
Note:
The replacement cable comes with a new grommet. The old grommet may be replaced with the new one, or left in if not damaged.
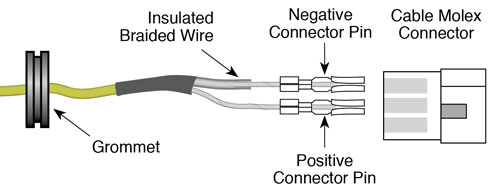
102/102M Replacement Cable for Mk1 102
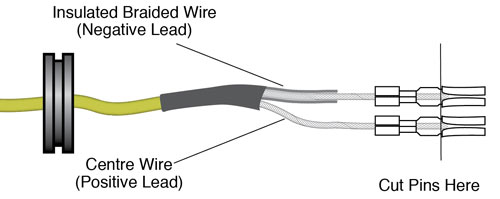
102/102M Replacement Cable for Mk2 102
Note:
There is no black plastic bridge in a 102M Mini reel.

Jumper Cable (New Cable - 3 Pin to 2 Pin) (#110508)
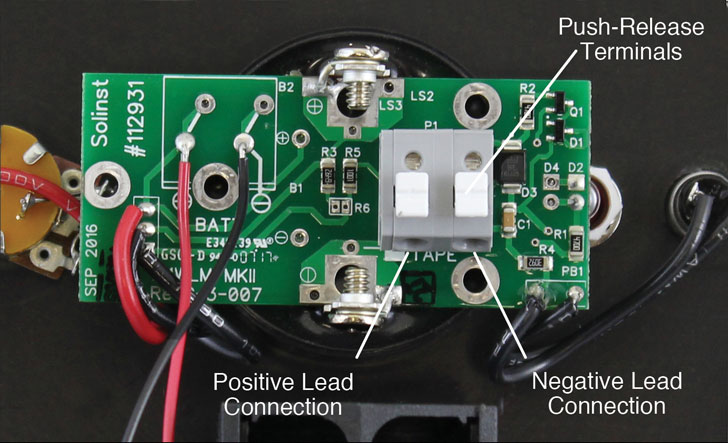
102/102M Mk2 Cable Connection to Circuit Board


