Model 122M Interface Meter PVDF Laser Replacement Cable to Reel Instructions
Tools and Materials Needed
- Model 122M Replacement Cable Assembly
- Probe Seal Plug included on Cable
- Grommet
- 3 Pin Cable Molex Connector
- Phillips or Robertson Screwdriver
- Wire Cutters
122M P8 Replacement Cable Instructions
Note:
See separate instructions for probe attachment.
- Place reel on a flat workbench with faceplate up. Undo the three screws from the faceplate, and slowly remove it from the reel.
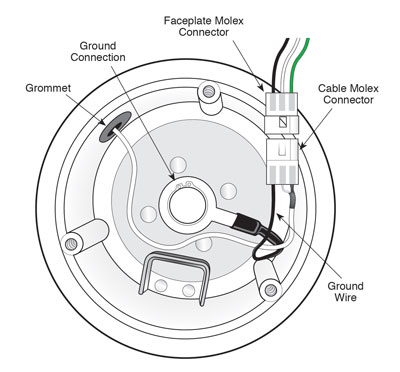
- Disconnect old cable Molex connector from the faceplate Molex connector.
- Remove the ground wire from the cable Molex connector by pushing out the pin.
- Use the wire cutters to cut the old cable Molex connector from the old cable.
Note:
The ground wire will be connected to the cable Molex connector in the reel. The replacement cable comes with a new Molex connector, which may be used if old cable Molex connector is damaged. Ensure proper wire attachment.

Inside View of 122M P8 Reel Hub Showing Cable Connection Detail
- Pull the old cable through the grommet and remove from the reel.
Note:
The replacement cable comes with a new grommet. The old grommet may be replaced with the new one, or left in if not damaged.

- Feed the new cable with connector pins through the grommet into the reel hub.
- By hand, insert the connector pins into the new cable Molex connector. The connector pin on the insulated wire is inserted into the terminal on the pointed side of the cable Molex connector, and the connector pin on the braided wire is inserted into the middle terminal. (The ground wire is inserted into third terminal).
- Connect the cable Molex connector to the faceplate Molex connector.
- Attach the old probe to the new cable, or attach a new probe if the old one is being replaced. Please see separate probe attachment instructions.
- With the probe in a glass of tap water and product, turn the Interface Meter on. A steady tone and light indicates a product, while an intermittent tone indicates water. If the buzzer or light do not activate, check the probe and cable connections.
- Replace the faceplate on the reel and re-secure the three screws.
- Slowly wind the cable onto the reel, holding to ensure no slack.


