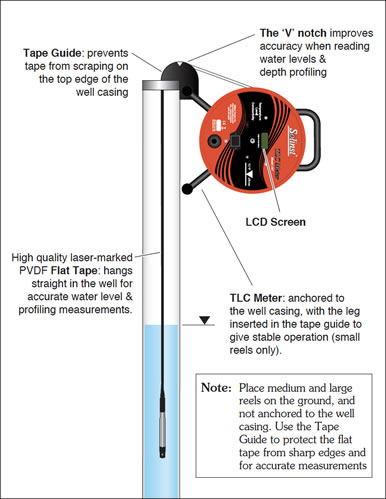
Taking TLC Meter Measurements
Notes:
- The zero measurement point of the TLC Meter is the tip of the shorter sensor pin visible within the shroud at the bottom of the probe.
- If the display indicates ‘LOW BATT’ there is still some life left in the battery, but it is recommended that you change the batteries as soon as possible.
- Turn the meter on and lower the probe into water. A tone and light indicate that water has been reached and the depth can be read off the tape and recorded. The LCD screen is blacked out for about one second as the probe enters water. A weaker tone sounds with a quick red light as the probe is removed from water. Lower and raise the probe slowly a few times to verify the depth.
- Once in water, the screen displays specific conductance (EC) and temperature of the water at the zero point. Lower the probe to the desired depth. Record the depth and the associated conductivity and temperature readings when stabilized. Allow at least 30 seconds/°C of temperature change for stabilization.
To conserve battery power, the display has an auto off after 8 minutes of use. If the display is blank when you wish to take a measurement, press the button to display temperature and conductivity readings. - Repeat at each desired depth allowing 30 seconds/°C temperature change for stabilization.
- After each use remove the probe shroud and clean the sensor pins with a soft cloth, then rinse thoroughly with de-ionized water (see cleaning section for more details).
- To turn the TLC Meter off, press and hold the button to display "Press 2X for OFF, then press the button 2 times quickly.

Tape Guide Instructions
- Fit the Tape Guide over the top of the well, small end in.
- Insert the leg of the TLC Meter into the hole on the Tape Guide and rest the TLC Meter on the side of the well casing (small reels only, see diagram).
- Take all measurements at the ‘V’ notch on the Tape Guide, and adjust readings according to the offset stamped on the Tape Guide (i.e. subtract 6 cm or 2/10 ft).
- When finished, store the Tape Guide by clipping it onto the support bracket on the back of the TLC Meter.
Cleaning
- Pull the plastic shroud straight off the probe (do not twist).
- Clean probe and sensors with a cloth or paper towel.
- To remove hard deposits or stains on the probe and sensor pins, use either pure white vinegar (acetic acid) or CLR diluted by 50%. Try a 30 minute soak followed by gently rubbing with Q-tip, or soft cloth.
- Rinse thoroughly with de-ionized water.
- If about to calibrate rather than storing the TLC, rinse in the calibration solution you are using according to the instructions overleaf.
- Replace the shroud by rotating it until it seats, then push to lock in place. This is important as it can affect conductivity readings.


