Tools and Materials Needed
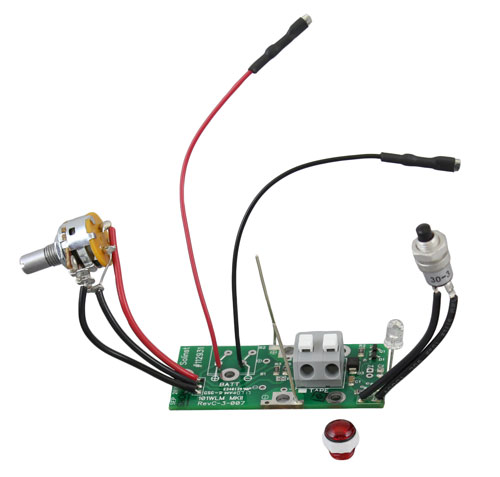
- Mk2 Circuit Board Assembly (#102977) Includes:
- Wiring, Sensitivity Switch and Knob, Light and Red Lens, and Test Button
- Phillips Screwdriver
- 10 mm (3/8") Wrench
- Wire Cutters (if required)
- Small Flat Screwdriver (3 mm (1/10")
- Pliers
Instructions
For Mk2 Water Level Meters (Push-Release Tape Connection)
Note:
Instructions for Mk1 Water Level Meters (Molex tape connection, soldered connections to battery tray) are on Page 2.
- Remove the battery. Unscrew the three screws and remove the faceplate.
- Press down on the white terminals of the push-release fittings on the circuit board and pull out to remove the tape leads.
- Pull the quick-connect fittings off of the terminals on the battery tray.
- From the front of the faceplate, use the wrench to unscrew the nut holding the test button and push the button back out of the faceplate.
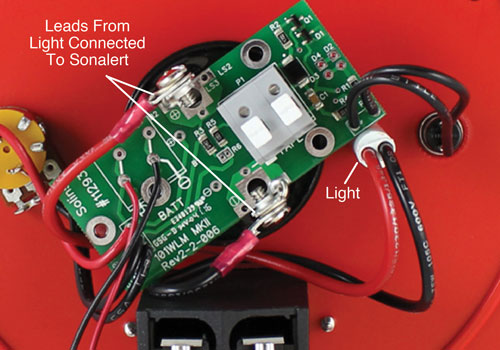
Back of Mk2 Water Level Meter Faceplate with Older Style Light
- If you have an older style light (leads connected to Sonalert terminals – see photo above), cut the red and black wires connected to the light, and push the light out through the front of the faceplate.
- Use the small flat screwdriver to unscrew the small brass screw on the side of the sensitivity knob. Remove the sensitivity knob. Use the pliers to unscrew the nut holding the sensitivity switch and remove the switch from the faceplate. Save the knob and screw to be used with the new sensitivity switch.
- Remove the two screws to disconnect the old circuit board assembly from the Sonalert. Remove the old circuit board.
- Loosen the Sonalert retaining nut on the front of the faceplate, so you can reposition the Sonalert as shown in the photo below (negative terminal next to the battery tray).
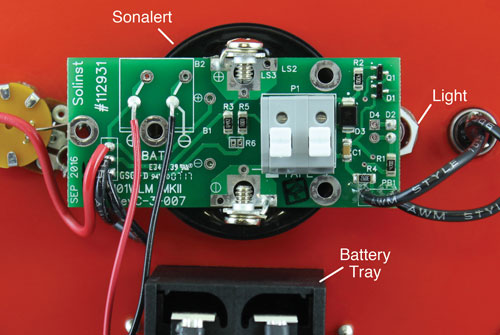
Back of Mk2 Water Level Meter Faceplate with New Style Light
- If you had an older style light (or the lens needs replacing) insert the new red lens through the opening in the faceplate and secure using the white nut.
- Place the circuit board assembly in position on top of the Sonalert, ensuring the sides marked +ve and -ve are lined up with the corresponding terminals on the Sonalert and the light seated in the lens.
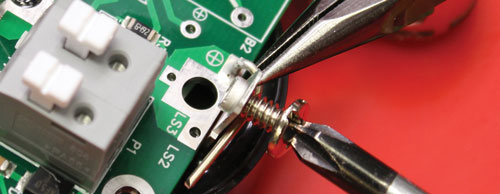
- Install the two screws into the Sonalert terminals. Do not tighten. Wrap the two bare wires from the circuit board around the screws, between the screw head and Sonalert terminals. Start by bringing the wires underneath the screws (see photo below). Tighten the two screws.
- Insert the test button through the opening in the faceplate, and secure it in place using the nut.
- Insert the sensitivity switch through the faceplate with the three connection prongs positioned towards the battery drawer, slightly towards the centre of the reel. Tighten the nut. Fasten the sensitivity knob on the front of the switch using the brass screw.
- Connect the black wire with quick-connect fitting to the negative terminal on the battery tray. Connect the red wire with quick-connect fitting to the positive terminal.
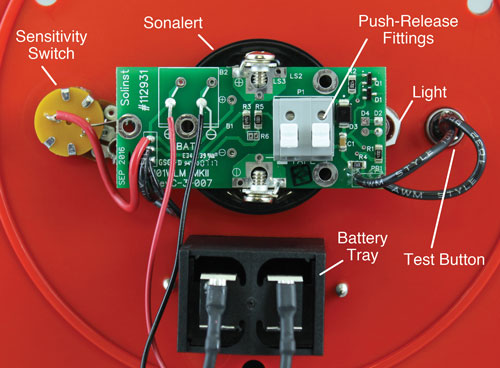
Back of Fully Assembled Water Level Meter Faceplate
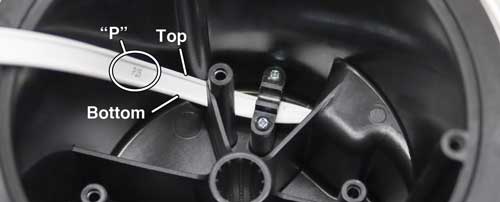
- Connect the tape to the new circuit board assembly by pressing down on the white terminals on the circuit board and inserting the tape leads. Release the terminals and the leads should be secured. The lead on the top of the tape is inserted into the terminal with a white square below it on the circuit board.
Note:
There is a "P" etched on the tape to help denote the proper orientation of the tape – top and bottom leads.
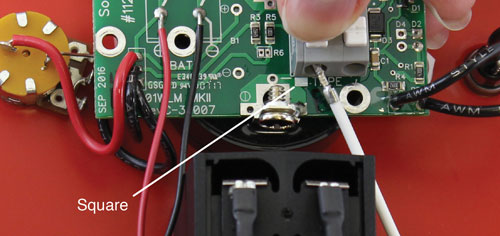
- Install the battery.
- With the probe in a glass of tap water, turn the Water Level Meter to the 'ON' position. If the connections are correct the buzzer and light will activate. If the buzzer or light do not activate, check all connections and the polarity of the battery.
- Reattach the faceplate to the reel using the three screws.


