Model 105
Well Casing Detection:
Quick intermittent beeps and flashing red light.
Total Well Depth:
Slow intermittent beeps and flashing red light.
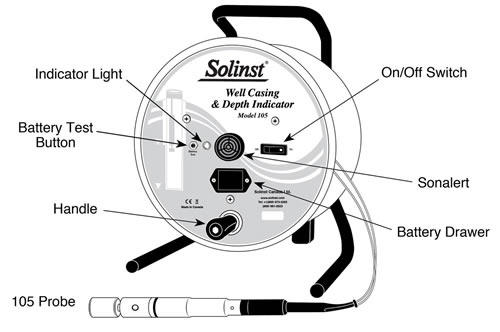
Front View
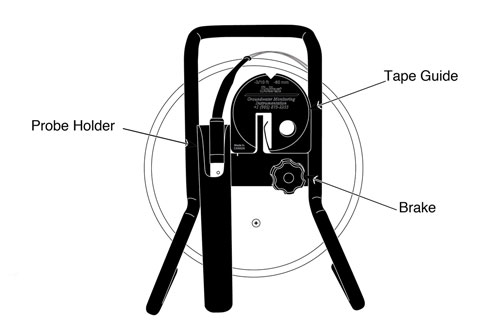
Back View
Equipment Check
- Use the on/off switch to turn the Meter on.
- Depress the battery test button to test the battery and main circuitry (does not test the tape or probe). This activates the buzzer and light. Replace the battery if there are no signals.
- To test the well casing detection function, place the probe adjacent to magnetic metal in a vertical (hanging) position. This completes the circuit and activates the buzzer and light. Well casing detection is signaled by quick intermittent beeps and a flashing red light.
Note:
The Well Casing Depth Indicator detects magnetic metals only, and will not detect PVC or stainless steel.
- To test the well depth function, ensure the probe shaft is clean of debris. Push the plunger at the bottom of the probe into the probe body. This completes a magnetic circuit and activates the buzzer and light. Total well depth is indicated by slow intermittent beeps and a flashing red light.

Routine Care
- Ensure you turn the Meter off after each use.
- After use, the tape should be carefully rewound onto the reel, the probe wiped dry and placed into the probe holder.
- The probe, tape and reel can be wiped clean with phosphate free (non-abrasive) detergent and warm water. Do not submerge the reel.
- Use of a carrying bag adds to the service life of the meter.
- Use of the tape guide adds to the life of the tape.
Probe Care and Cleaning
- The probe should be wiped clean after each use.
- It is recommended to periodically disassemble the plunger to thoroughly clean the inside, as well as the magnet.
- Simply unscrew the three parts of the plunger assembly (shown below) and clean with a soft cloth, non-abrasive soap and warm water.
- After cleaning, reassemble the probe and place the probe back in its holder.

Battery Replacement
- Battery type - alkaline, 9 volt.
- The battery is housed in a battery drawer in the faceplate.
- To replace the battery, simply press the drawer in, lift then pull.
- The battery drawer will slide out enough to pull it out.
- Note the polarity (positive (+) terminal should be towards the small notch in the end of the drawer) and place new battery in the drawer and slide it back into the faceplate.
Replacement Parts
The following parts can be provided should they become lost or damaged:
- Probes
- Tapes with tape seal plug
- Lights, switches, etc.
- Reels
The Tape Guide
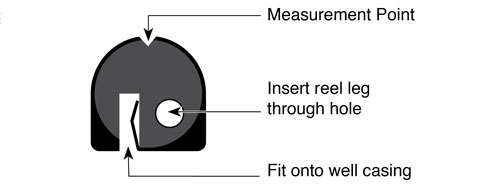
- Fit the small end of the tape guide onto the edge of well casing 2" (50 mm) diameter or larger.
- For small reels only, insert the leg into the hole in the tape guide and rest the reel on the side of the well casing.
- When using the tape guide, the measuring point is offset from the top of casing. To adjust your measurements, simply subtract the amount indicated on the front of the tape guide (i.e. 6 cm or 2/10 ft).
- To store the tape guide, simply clip it onto the support bracket located on the back of the reel.
Well Casing Depth Measurements
- Feed the tape into and out of the well using the groove in the top of the Tape Guide.
- Lower the probe slowly into the well. The light and buzzer will be activated when it is adjacent to metal casing. The signals will stop as the probe passes the bottom of the casing. Read the depth from the tape.
Note:
The probe's internal magnet will be attracted to the side of any magnetic well casing. The probe will slide down the side of the well casing as it is being lowered. Once the casing ends, the magnetic attraction is lost.
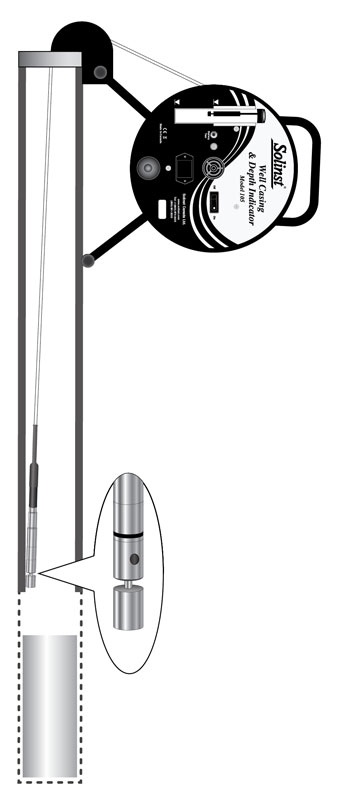
Well Casing Indication
Total Well Depth Measurements
- Feed the tape into and out of the well using the groove in the top of the Tape Guide.
- The light and buzzer activate when the plunger at the end of the Well Casing and Depth Indicator probe reaches the bottom of a well and is pushed into the probe body. Read the depth from the tape.
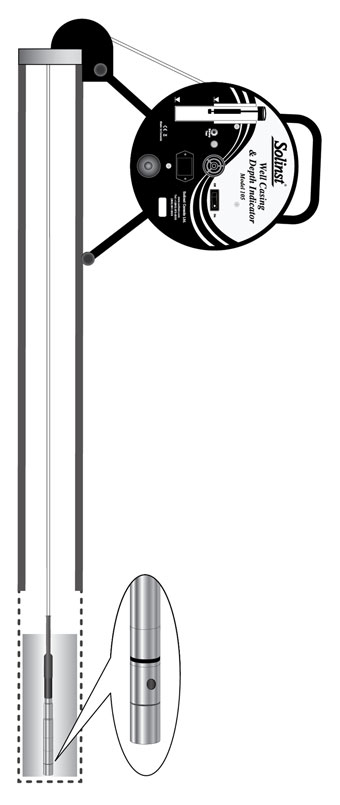
Total Well Depth Measurement
| Troubleshooting | ||
|---|---|---|
| SYMPTOM | CAUSE | REMEDY |
| No sound when probe adjacent to magnetic metal casing or plunger activated. | Dead battery. | Replace with 9V Alkaline. |
| Magnet is dirty. | Disassemble the probe plunger and clean. | |
| Disconnected wires on circuit board. | Check all connections inside hub of reel for loose/disconnected wires - solder or reconnect. | |
| Broken wire in tape. | Locate break in tape - splice and seal, or replace. (Contact Solinst) | |
| Disconnected wire inside probe. | Contact Solinst to obtain parts/repair instructions. | |
| Instrument continuously sounds. | Water in probe. Probe may be dirty which could interfere with the circuit connection. | Clean probe. Remove probe. If sounding stops, check/replace o-ring. If sounding continues, check connection of electronics and wiring in reel. If sounding continues, contact Solinst for assessment or replace probe with new probe. |


