Interface Meter: Internal Ground Cable Replacement

Tools and Materials Needed
- Model 122 (CSA) Internal Ground Cable Assembly for Interface Meter (spare) (#111835)
- Phillips or Robertson Screwdriver
- Molex Pin Extraction Tool (available at most tool outlets)
- External C-Ring Pliers (available at most tool outlets)
Instructions
- Place the Reel on a flat workbench with the Faceplate up. Remove the battery.
- Use the screwdriver to undo the three screws from the Faceplate, and slowly remove it from the Reel.
- Disconnect the Tape Molex Connector from the Faceplate Molex Connector. Set the Faceplate aside.
- Use the extraction tool to push and remove the two Connector Pins from the tape, out of the Tape Connector.
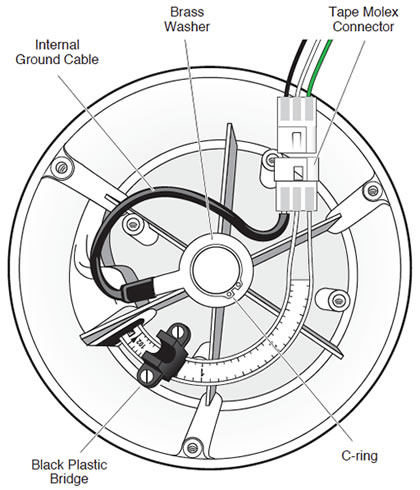
- To remove the old Ground Cable Assembly from inside the Reel Hub, use the external C-ring pliers to undo the C-ring that is holding the brass washer of the assembly to the Reel.
- Place the brass washer of the new Ground Cable Assembly in position in the Reel Hub. Replace the C-ring to secure the new Ground Cable Assembly to the Reel.
- By hand, insert the Connector Pins from the tape into the new Tape Connector of the Ground Cable Assembly. Hold the tape with numbers facing you, right-side-up. Insert the Connector Pin located above the numbers into the hole at the pointed end of the Connector, and the other Connector Pin in the middle hole. The ground cable is in the bottom position.
- Connect the Tape Connector to the Faceplate Connector. Replace the battery.
- With the Probe in a glass of tap water and product, turn the Interface Meter to the ‘ON’ position. A steady tone and light indicates a product, while an intermittent tone indicates water. If the buzzer or light do not activate, check the connections.
- Replace the Faceplate on the Reel and re-secure the three screws.
Note:
The new Ground Cable Assembly comes with a Tape Molex Connector attached; therefore there is no need to remove the Connector from the old Ground Cable Assembly.
Note:
Ensure the Connector Pins are pushed and secured into position in the Tape Molex Connector.