Water Level Meter: Tape Splice Instructions
Tools and Materials Needed
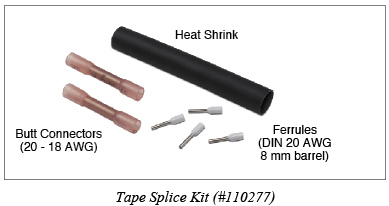
- Tape Splice Kit - Crimp Style (#110277)
- Scissors or Shears
- Wire Stripper
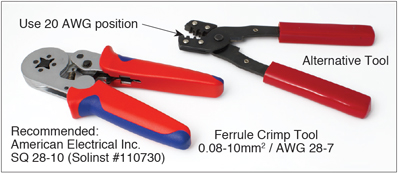
- Ferrule Crimp Tool (see photo)
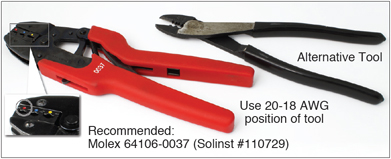
- Molex Crimp Tool (see photo)
- Heat Gun
- Soldering Iron (if using polythylene tape)
- Solder Wire with Acid Flux (if using polythylene tape)
- Acetone or Lacquer Thinner (if using polyethylene tape)

Instructions
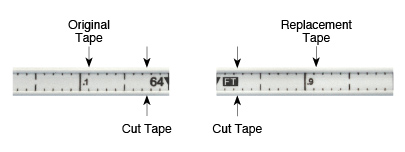
- Cut the replacement tape and original tape at a FT or M marking. Cut each tape back by 2.5/100 ft (2.5 markings), or by 7 mm (7 markings) if using metric tape. See diagram.
- Cut both the replacement tape and original tape ends along the wire leads approximately 1" (25 mm), then remove the section of tape between the wire leads.
- Strip the wire leads on both tapes 0.2" (5 mm), so the ferrules slide easily onto the lead ends.
- If you are splicing the heat embossed polyethylene tape, you will need to pre-tin the wires of the polyethylene tape before installing the ferrules. Pre-tin the wires by applying a thin layer of acid flux and solder to the wires using tip of soldering iron. After using the flux, clean the wires with acetone or lacquer thinner. The wires of the laser marked tape do not require solder.
- Ensure each ferrule is slid onto the lead end far enough that the metal end of the ferrule is crimped onto the stripped wire.
- You may need to twist the wires so they slide easier into the ferrules. Use a ferrule crimp tool to connect a ferrule to each stripped lead end. See photo of tool options.
- Slide the piece of 3" (7.6 cm) long 3/8" (9.5 mm) diameter heat shrink over one of the tapes, and push out of the way.
- Push the ferrules on each lead wire into the butt connectors as far as possible. Use the Molex crimp tool to attach the connectors to the ferrules. Use the first (red 20-18 AWG) position on the crimp tool. See photo of tool options below.
- With the probe in a glass of tap water, test that the Meter is working correctly (see Operating Instructions, if required). If it is not operating as expected, check the splice connection.
- Use the heat gun to shrink each butt connector's insulation.
- Push the piece of heat shrink over the connection, use the heat gun and apply heat onto the heat shrink starting in the middle and smoothing out any air pockets that form under the heat shrink. Press the heat shrink onto the connection with your fingers.


Note:

Ferrule Crimp Tool Options (20 AWG)


Molex Crimp Tool Options (20-18 AWG)

Note:
Be careful not to melt the tape with the heat gun.


