Cut the old coaxial cable at the exposed area and slide the 1/8" x 3-1/2" (3.2 mm x 89 mm) then the 1/8" x 2-1/2" (3.2 mm x 64 mm) pieces of heat shrink over the cable. Move the heat shrink up the cable.
Strip 1" (25 mm) off the new and 1" (25 mm) of the old cable’s outer coating exposing the braided wire.
Undo the braided wire and divide the strands into two equal groups on each cable. Twist the wire strands of one of the groups together. Remove the other group by cutting the strands at the edge of the outer coating.
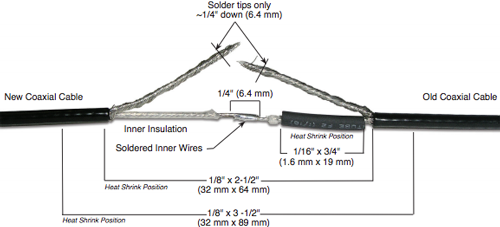
Place the 1/16" x 3/4" (1.6mm x 19 mm) piece of heat shrink over the inner insulation of the old cable, which is now exposed. Push the heat shrink up to the edge of the outer coating.
Strip the inner insulation of each cable approximately 1/4" (6.4 mm) exposing the stainless steel wires. With the Kester Liquid Acid Flux, pre-tin the stainless steel wires by applying a small amount of solder to the wires with the soldering iron. Clean wires with alcohol, and smoothly solder together.
Slide the 1/16" x 3/4" (1.6 mm x 19 mm) piece of heat shrink over the connection (see diagram, above).
Carefully apply heat from the centre working outward to prevent air pockets forming under the heat shrink.
Lay the twisted wires from each cable over the heat shrink so that they overlap. Carefully solder the wires together (see diagram). You do not have to use Acid Flux with these wires.
Slide the 1/8" x 2-1/2" (3.2 mm x 64 mm) piece of heat shrink over the connection centering the heat shrink (see diagram).
Being careful not to melt the outer coating of the cable, apply heat and press heat shrink onto the connection with your fingers.
Centre the 1/8" x 3-1/2" (3.2 mm x 89 mm) piece of heat shrink over the connection. Starting from the centre working outwards, apply heat to the heat shrink and press the connection with your fingers.