Tools and Materials Needed
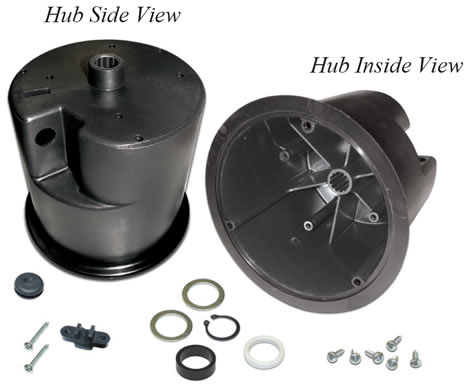
- SC Series Replacement Hub Assembly (#103561)
- Molded Hub (#102157)
- Retaining Ring (#102159)
- 2 x Stainless Steel Washers (#102560)
- Nylon Washer (#103507)
- Clamp (#102164)
- 2 Robertson Screws (#103494)
- 6 x Phillips/Robertson Screws (#103485)
- Grommet (#102864)
- Black Delrin Spacer (not used for SC2000 reels) (#102163)
- Phillips Screwdriver
- Robertson (Square head) Screwdriver
- Retaining Ring Pliers (Solinst pt#103546 or similar)
- Molex Pin Extraction Tool (available at most tool outlets)

101/102 Replacement Hub Assembly
Removing the Old Water Level Meter Hub
- Unwind the tape/cable from the hub and pull it through the grommet until you come to the end.
- Use the Phillips or Robertson screwdriver to undo the three screws holding the faceplate to the hub. Remove the faceplate.
- For Mk1 Water Level Meters, disconnect the Molex connector that attaches the faceplate electronics to the tape/cable. For Mk2 Water Level Meters, press down on the push-release fittings on the circuit board to remove the tape/cable leads. Remember which lead is removed from each terminal – this is important when reconnecting.
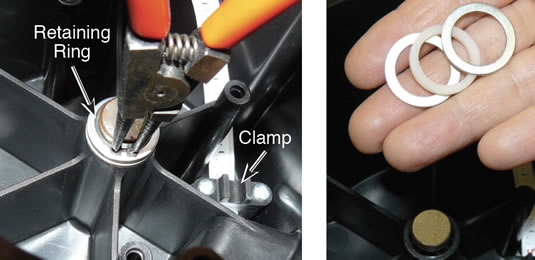
- Remove the two Robertson screws holding the clamp over the tape/cable inside the hub and remove the clamp.
- For Mk1 Water Level Meters, use the Molex pin extraction tool to remove the pins from the tape/cable Molex connector, noting the polarity. The negative pin is removed from the terminal on the pointed side of the Molex connector.
- Pull the tape/cable through the grommet and remove it from the reel.
- Use the retaining ring pliers to remove the retaining ring holding the hub to the centre rod of the frame. Remove the three washers.
- Pull the hub and attached backplate from the frame.
- Remove the three screws holding the hub to the backplate.

Attaching the New Hub

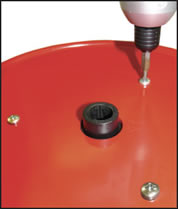
- Fasten the three screws to secure the backplate to the new hub (see photo at right).
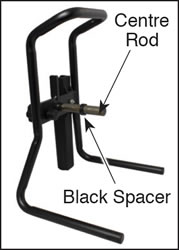
- Ensure the black delrin spacer is installed on the centre rod of the frame and the brake pad is flush with the back of the frame. Slide the hub and backplate back onto the frame (See photo at right).
Note:
SC2000 reels do not need the spacer, as there is a shoulder on the centre rod.

- Replace the three washers over the centre rod (nylon washer between the two stainless steel washers) and reinstall the retaining ring on the centre rod.
- Feed the tape/cable through the grommet in the new hub (grommet may need to be installed in hub opening).
- For Mk1 Water Level Meters, by hand, insert the pins back into the Molex connector. The negative pin is inserted into the terminal on the pointed side of the Molex connector, and the positive pin into the other/middle terminal.
Note:
Model 101: the negative pin is on the top of the tape, numbers facing up. Model 102: the negative pin is connected to the black insulated braided wire.
For Mk2 Water Level Meters, push down on the white terminals on the circuit board, insert the leads, then release the terminals.
- Position the tape/cable inside the hub, with the clamp over top and numbers facing up. Refasten the two screws to secure the tape/cable to the new hub.
- For Mk1 Water Level Meters, connect the Molex connector from the faceplate to the tape/cable.
- With the Probe in a glass of tap water, turn the Water Level Meter to the 'ON' position. If the connections are correct, the buzzer and light on the Meter will be activated. Check connections if the buzzer does not sound.
- Align the faceplate on the hub and re-secure the three screws.
- Slowly wind the tape/cable onto the reel, holding to ensure no slack.


