Equipment Check
- Submerse the probe in tap water to test the probe. This completes the circuit and activates the buzzer and light.
Water Level Measurements
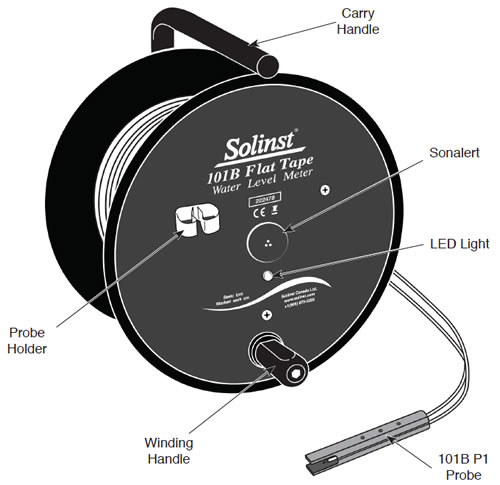
- The zero measurement point on the 101B P1 Probe is at the tip of the conductor pins.
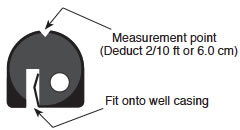
- Feed the tape into the well. If a tape guide is used, lay the tape onto the groove on the top. Measurements will be read at the point of the V-notch on the tape guide. Remember to deduct 2/10 ft or 6.0 cm.
- The light and buzzer activate when the probe conductor pins enter water. To ensure accuracy, lower and raise the probe a few times and then record the depth measurement from the tape at the top of the well.
Tape Guide (Optional)

Routine Care
- After the depth to water has been recorded, the tape should be carefully rewound onto the reel, the probe wiped dry and placed into the probe holder.
- The probe, tape and reel can be wiped clean with phosphate free (non-abrasive) detergent and water. Do not submerge the reel.
Battery Replacement
- Battery type - alkaline, 9 volt.
- The battery is housed within the faceplate of the reel.
- Using a Phillips screwdriver, remove the three screws on the faceplate.
- Carefully remove the faceplate so as to not unwind the tape.
- Replace the battery.
- Carefully place the faceplate back onto the hub and line up the holes.
- Once the screws have been tightened and the faceplate is secure, test the water level meter.
Note:
Before screwing the faceplate back onto the hub, make sure no wires are outside the hub.
Replacement Parts
The following parts can be provided should components become lost or damaged.
- Splice kits
- Electronics
- Faceplate and backplate
- Tapes
- Probes
- Probe holders, brakes, etc.
Troubleshooting
| SYMPTOM | CAUSE | REMEDY |
|---|---|---|
| No sound when probe immersed in water. | Dead battery. | Replace with 9V Alkaline. |
| Water Conductivity is very low. | Try a different Solinst 101 Water Level Meter. | |
| Disconnected wires on circuit board. | Check all connections inside hub of reel for loose/disconnected wires - solder or reconnect. | |
| Broken wire in tape. | Locate break in tape - splice and seal, or replace. (Contact Solinst) | |
| Damaged probe. | Contact Solinst to obtain parts/repair instructions. | |
| Instrument continuously sounds after being immersed in water. | Probe may be dirty which could interfere with the circuit connection. | Contact Solinst for instructions to remove, clean and replace the probe. |
| Instrument continues to sound during retrieval. | Water very dirty or very high in conductivity. | Shake probe once above water level. Do not lower probe beyond water level. |


