Tools and Materials Needed
- 12 Volt Compressor Assembly (#109483)
- 9/16" Wrench
- 3/8" Wrench
- 3/16" Allen Key
- Wire Cutters and Strippers, if required
- Pliers or Crimping Tool, if required
Instructions
CAUTION:
Ensure the power supply is disconnected from the 12V Compressor and the pressure has been fully vented from the tank.


12 Volt Compressor Assembly Connections to the Compressor Unit
Remove the Old Compressor Assembly
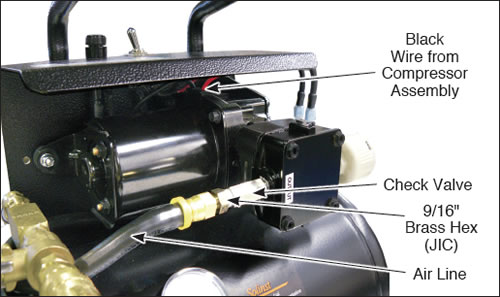
- Use the 9/16" wrench to undo the 9/16" brass hex (JIC) and remove the air line from the silver coloured check valve.
- Use the 3/8" wrench and 3/16" Allen key to undo and remove the three bolts holding the Compressor Assembly to the frame of the Compressor Unit.
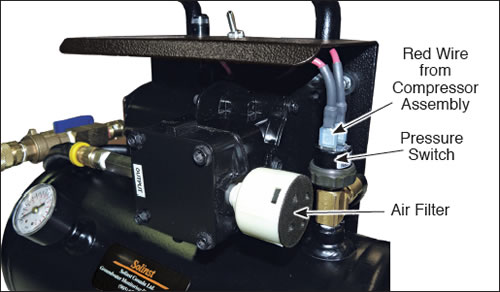
- Pull the red wire on top of the pressure switch to the old Compressor Assembly. Leave the adjacent red wire on the pressure switch.
- If you have an older Compressor Unit, cut the black wire of the old Compressor Assembly at a point about 3" (7.6 cm) away from the old Assembly. Strip the wire about 1/2" (1.25 cm).
If you have a newer Compressor Unit, simply disconnect the fittings connecting the black wires. - Remove the old Compressor Assembly from the Compressor Unit Frame.

Replacement 12 Volt Compressor Assembly
Connect the New Compressor Assembly
- Screw the check valve into the output of the new Compressor Assembly and tighten.
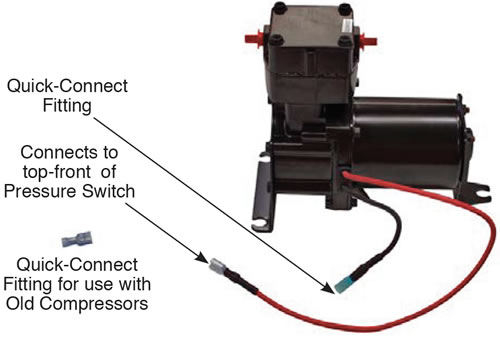
- If you have an old Compressor Unit, use the pliers or crimping tool to attach the quick-connect fitting to the stripped black wire. Connect to the fitting on the black wire of the new Compressor Assembly.
If you have a newer Compressor Unit, simply connect the two black wires using the quick-connect fittings. - Connect the red wire from the new Compressor Assembly to the terminal on the pressure switch.
- Use the three bolts to attach the new Compressor Assembly to the Compressor Unit frame.
- Use the 9/16" wrench to connect the air line to the check valve of the new Compressor Assembly.
Note:
Do not over-tighten the air filter when connecting to the new Compressor Assembly.
- By hand, screw the air filter into the new Compressor Assembly. Do not over-tighten.


